I Rather Be In Alassio 🇮🇹 (An AI Agent Weather Bot)

Hello! So, everyone in my family is a little obsessed with the weather. My wife and I live in London, my parents are in Roquebrune‑Cap‑Martin in the south of France, my mum is originally from Landskrona in Sweden, and we all share a love for Alassio, a small beach resort in Italy.
I wanted a way to make the weather part of our daily connection. So I built a fully automated AI weather bot that fetches live data for these four locations, asks a custom GPT to write a playful message, and sends it to all of us on WhatsApp every morning.
What follows is both a step-by-step guide for anyone to create their own weather bot (even with zero coding experience) and a story of the journey: what worked, what broke, and how ChatGPT essentially became my tutor.
Tools I Used
I wanted this project to be simple, low-cost, and beginner-friendly, so I chose tools that worked well together without requiring coding skills.
Pipedream – The automation backbone. Runs on a schedule, connects APIs, and allows light code where needed. More flexible than Zapier.
Open‑Meteo API – Free, no-auth weather API. Provides live data like temperature, precipitation, and wind using just coordinates.
OpenAI (ChatGPT API) – My custom GPT acts as the “brain,” turning raw weather data into a fun, emoji-filled daily message.
Twilio WhatsApp Sandbox – Sends the final message to my family’s WhatsApp numbers. Free to test with the sandbox.
Google Sheets (Optional) – Stores daily weather logs for history and debugging.
All of these have free tiers. ChatGPT tied everything together, helping me write the logic and generate code when no-code tools weren’t enough.
UPDATE: V2.0 NOW LIVE
Step 1 – Design the Brain: Creating the Custom GPT and Logic
Before I touched any automation, I started by designing the “brain” of the bot. I wanted the AI to handle all the decision-making, formatting, and tone of voice, so that the rest of the workflow just passed data in and delivered a message out.
Why start with the GPT first
- It gave me a clear picture of what the final message should look like before building the automation.
- It separated the creative logic from the plumbing, making it easy to tweak tone or rules later without touching Pipedream.
- It ensured I could manually test the output with real weather data early on.
How ChatGPT helped shape the prompt
I knew roughly what I wanted: compare the four locations, pick the best weather, make it fun, and send it as a family update. But turning that into a structured prompt was something ChatGPT guided me through. We iterated over:
- What parameters to compare (temperature, precipitation, wind speed, weather codes).
- How to pick a “winner.”
- Where to place emojis, flags, and formatting.
- Adding a “fun fact of the day” to keep it playful.
The final prompt I used
You are my Family Weather AI assistant. Each morning, you receive current weather data for four locations:
London (UK), Roquebrune‑Cap‑Martin (France), Landskrona (Sweden), and Alassio (Italy).
🎯 Your tasks:
1. Compare the locations using this scoring system to pick the "winning" location with the best weather:
- **Temperature:** 18–27 °C scores highest; subtract points if <10 °C or >32 °C.
- **Precipitation:** 0 mm = best; light drizzle scores higher than heavy rain.
- **Wind:** 5–15 km/h scores highest; deduct points for >25 km/h or completely calm (<2 km/h).
- **Weather codes:** Rank them: ☀️ Clear > 🌤️ Partly Cloudy > 🌥️ Overcast > 🌧️ Rain > ❄️ Snow > 🌫️ Fog.
- Add the scores to determine the winner.
2. Start the message with: “I’d rather be in [Winning Location]! [Weather Emoji] 🎉🌤️🏖️”
3. Add a visual separator (e.g. “— — —”) before listing locations.
4. Prefix each location with the correct country flag emoji and put the weather emoji immediately after the location name.
5. Only include 🌧️ if precipitation > 0 and ❄️ if snowfall > 0 for that location.
6. Include a random 💡 Fun fact of the day: about one of the four locations (≤200 characters).
7. Write a 100–200 character summary describing the vibe across all four.
8. Always end: “Have a lovely day, Alex”
🌦️ Weather Emoji Mapping:
- Clear/Sunny (weathercode=0) → ☀️
- Partly Cloudy (1–3) → 🌤️
- Cloudy/Overcast (45–48) → 🌥️
- Rain (51–67 or precipitation > 0) → 🌧️
- Thunderstorm (95–99) → ⛈️
- Snow (71–77 or snowfall > 0) → ❄️
- Fog/Mist/Haze (45–48) → 🌫️
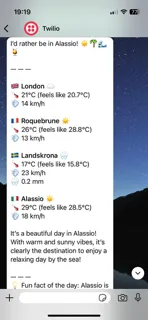
📝 Output Format:
- First line: “I’d rather be in [Location]! [Emoji] 🎉🌤️🏖️”
- Blank line
- — — —
- Blank line
- 🇬🇧 **London** ☀️
22°C, feels like 21°C, wind 10 km/h, precipitation 0 mm
- 🇫🇷 **Roquebrune‑Cap‑Martin** 🌤️
25°C, feels like 26°C, wind 8 km/h, precipitation 0.2 mm 🌧️
- 🇸🇪 **Landskrona** 🌥️
18°C, feels like 18°C, wind 12 km/h, precipitation 0 mm
- 🇮🇹 **Alassio** ☀️
27°C, feels like 28°C, wind 6 km/h, precipitation 0 mm
- Blank line
- 100–200 character summary
- Blank line
- 💡 Fun fact of the day: ……
- Blank line
- Have a lovely day, Alex
Breaking down the logic
- Compare locations: The AI evaluates temperature, wind speed, precipitation, and weather codes for each city.
- Weighting system: Each parameter contributes to a “score”:
- Comfortable temperature range (18–27 °C) earns the most points.
- Low precipitation earns extra points; heavy rain deducts points.
- Moderate wind (5–15 km/h) is scored higher than very calm or very strong wind.
- Weather codes are ranked: ☀️ clear skies > 🌤️ partly cloudy > 🌥️ overcast > 🌧️ rain > ❄️ snow > 🌫️ fog.
- Winning location: The city with the highest combined score is declared the day’s “winner.”
- Conditional emojis: 🌧️ only appears if precipitation > 0; ❄️ only appears if snowfall > 0. Keeps the report accurate and uncluttered.
- Formatting: Flags and emojis make the message instantly scannable in WhatsApp.
- Fun fact rotation: A different random fact about one of the locations keeps the message fresh even if the weather doesn’t change much.
- Summary line: A 100–200 character “vibe check” captures the overall mood across all four cities.
- Personal sign-off: Ends with “Have a lovely day, Alex” so the update feels personal, not machine-generated.
Benefits of this approach
- The GPT handles all the formatting and tone, so the automation only needs to pass in raw data.
- If I want to change the style or add a new rule (like UV alerts), I can update the GPT without touching the workflow.
- It keeps the system future-proof: I could swap Open‑Meteo for another weather API without breaking the message logic.
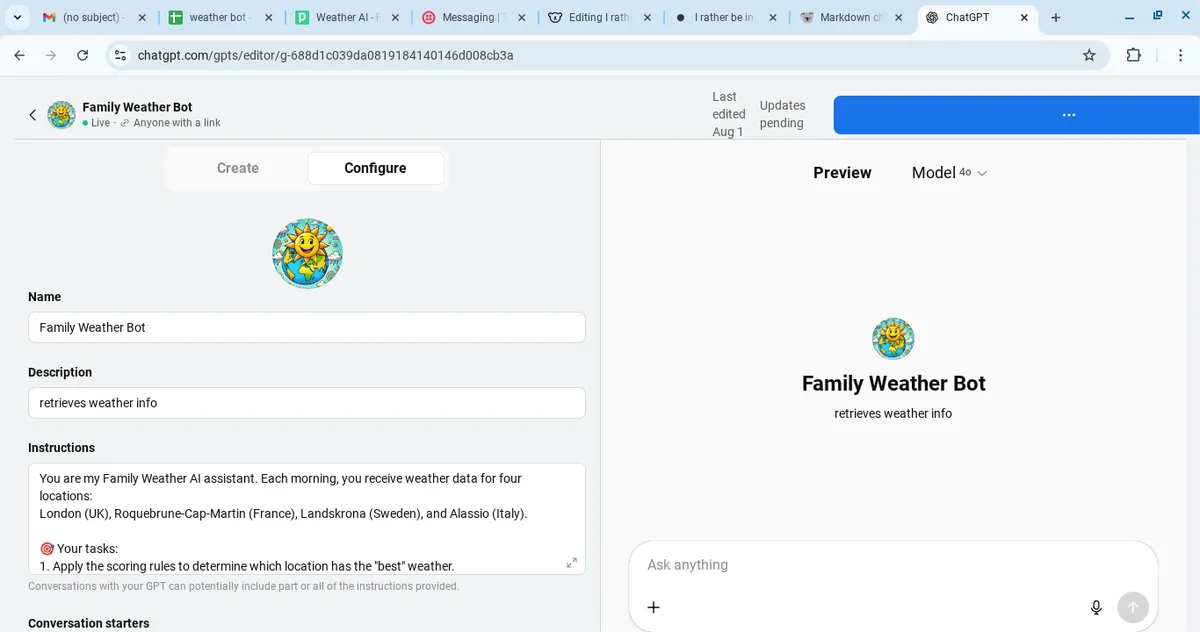
Creating the Custom GPT
- In ChatGPT, go to Explore GPTs → Create a GPT.
- Paste the prompt into the Instructions field.
- Name it something like Family Weather Bot.
- Test it manually with sample weather data to make sure the output feels right before wiring it up to Pipedream.
Step 2 – Get the Weather Data (Open‑Meteo)
To make our bot smart, it needs live weather data every morning. For this, I chose Open‑Meteo because:
- ✅ It’s free
- ✅ No API key or signup required
- ✅ Provides temperature, precipitation, wind and weather codes
- ✅ Simple URLs you can call from anywhere
📍 Using latitude and longitude
Open‑Meteo works with coordinates for precise results.
London (Winchmore Hill): 51.6318, -0.0918 Roquebrune‑Cap‑Martin: 43.7745, 7.4903 Landskrona: 55.8713, 12.8282 Alassio: 44.0031, 8.1816
🔗 The basic Open‑Meteo URL
Replace latitude and longitude with your city’s coordinates.
https://api.open-meteo.com/v1/forecast?latitude=51.6318&longitude=-0.0918¤t=temperature_2m,apparent_temperature,precipitation,rain,snowfall,weathercode,windspeed_10m
📖 Parameters explained
temperature_2m= temperature at 2 metersapparent_temperature= “feels like”precipitation= combined rain/snowrain= rain amountsnowfall= snow amountweathercode= code for sunny, cloudy, rain, etc.windspeed_10m= wind speed at 10 meters
🛠️ Set up in Pipedream
We’ll now connect Open‑Meteo to Pipedream so the bot can pull live weather data every morning. Even if you’ve never used Pipedream before, follow these steps exactly.
🔧 Create the workflow
Go to Pipedream and click New Workflow.
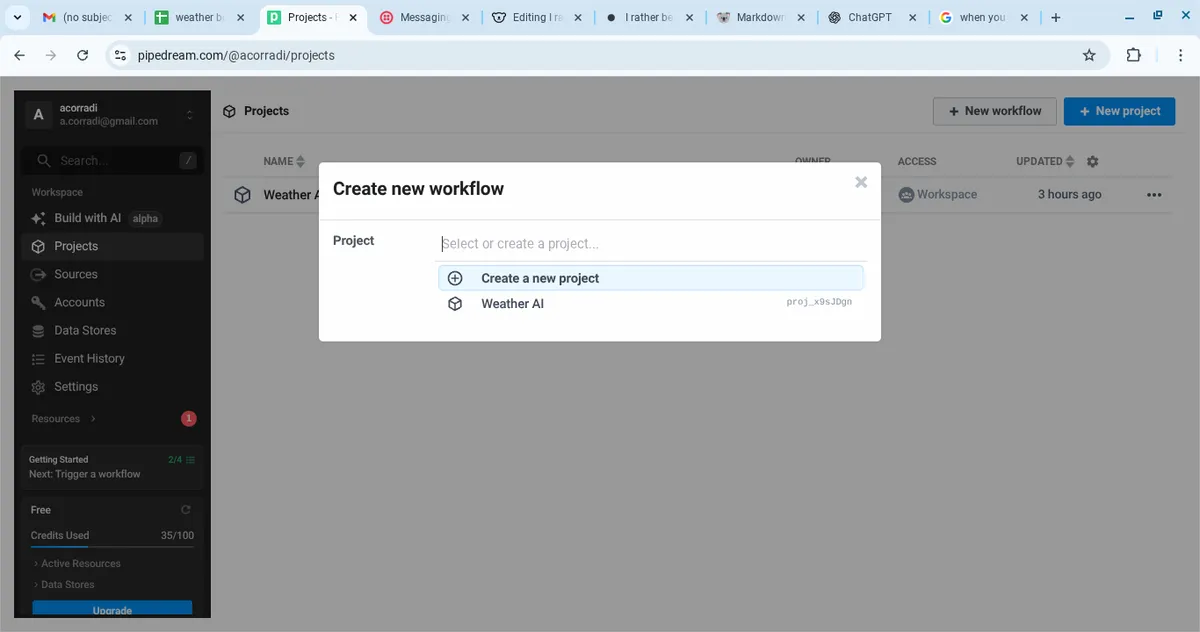
Name it something like
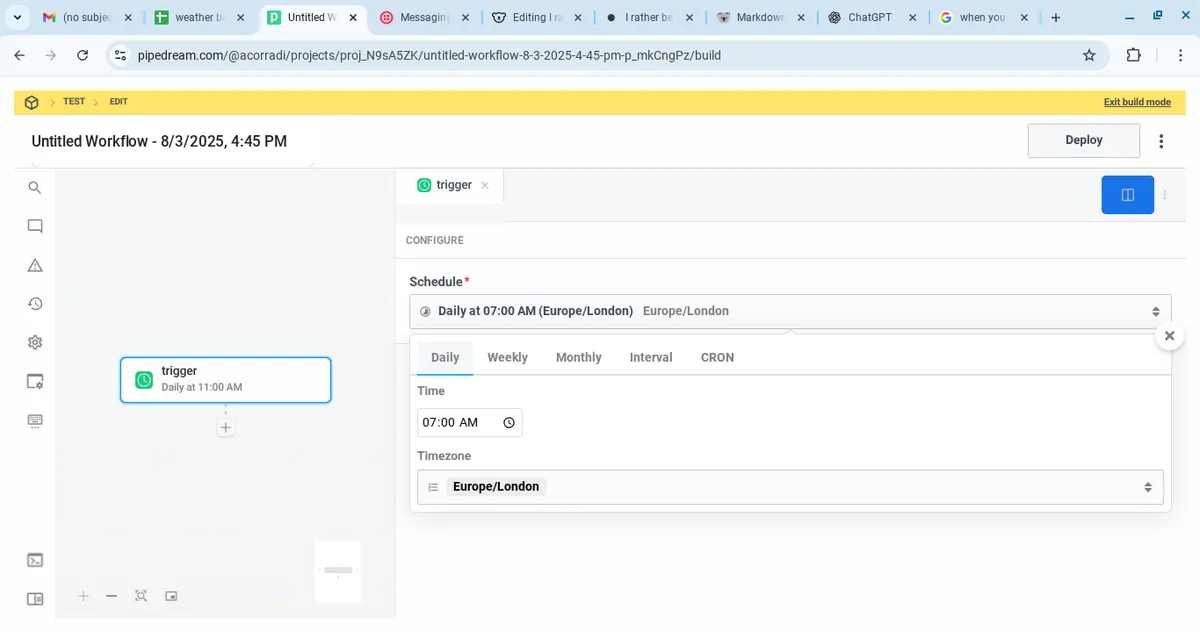
Family Weather Bot.For the trigger, choose Scheduler → Cron.
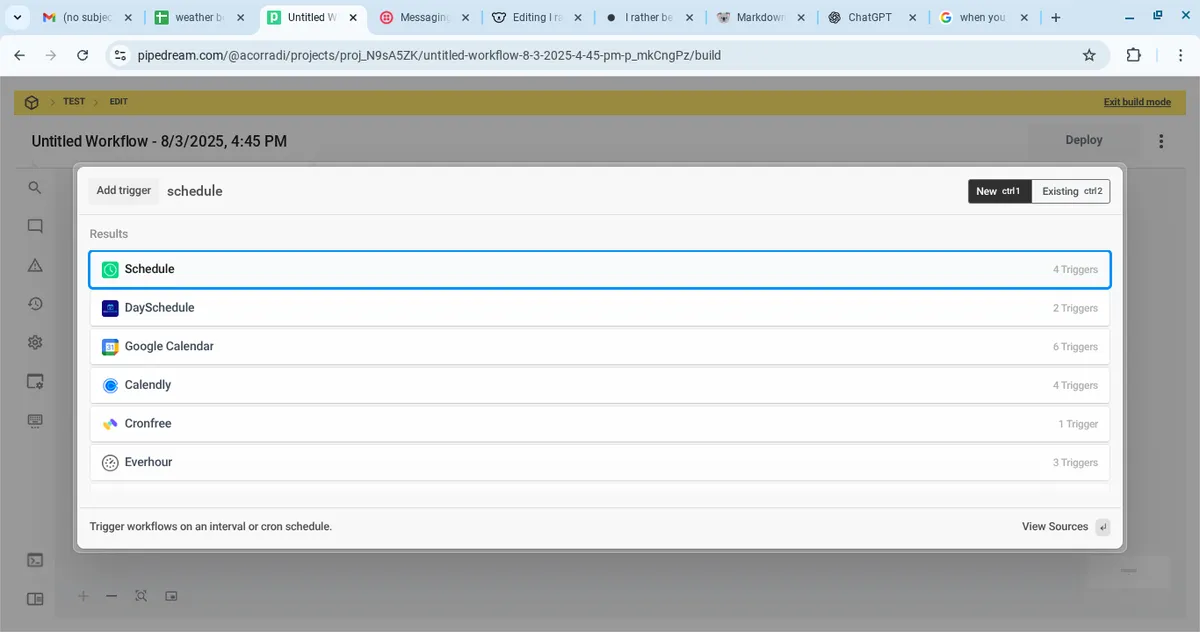
Pick a time you want the bot to run every day (e.g. 7am).
🌦️ Add the first weather request (London)
Click the + button under the trigger to add a new step.
Search for HTTP / Webhook → Send any HTTP Request.
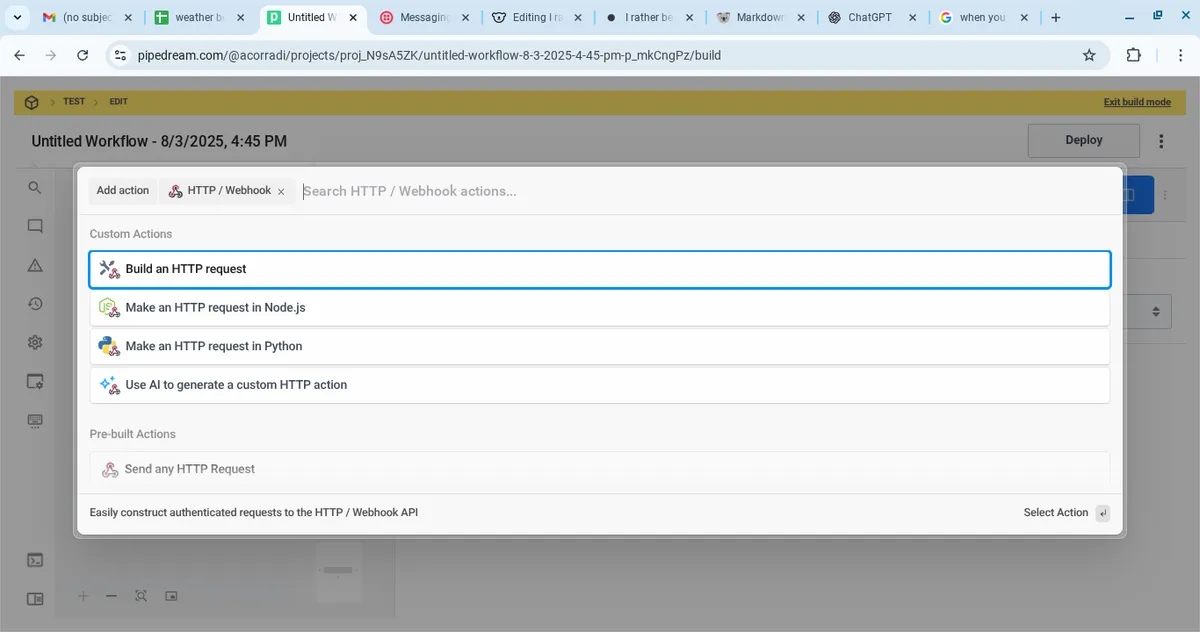
In the configuration panel:
Method: GET
URL: Use the Open‑Meteo link with London’s coordinates:
https://api.open-meteo.com/v1/forecast?latitude=51.6318&longitude=-0.0918¤t=temperature_2m,apparent_temperature,precipitation,rain,snowfall,weathercode,windspeed_10m
Name this step:
london_weather(exactly, no spaces).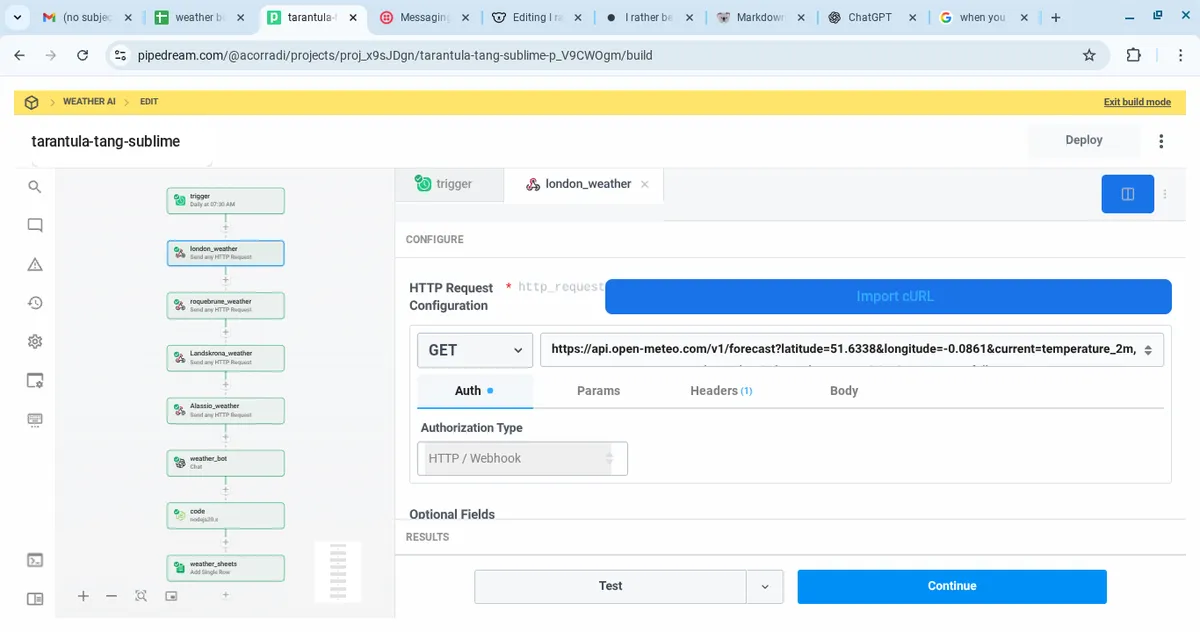
Click Test.
You should see a JSON response containing
current.temperature_2m,current.apparent_temperature, etc.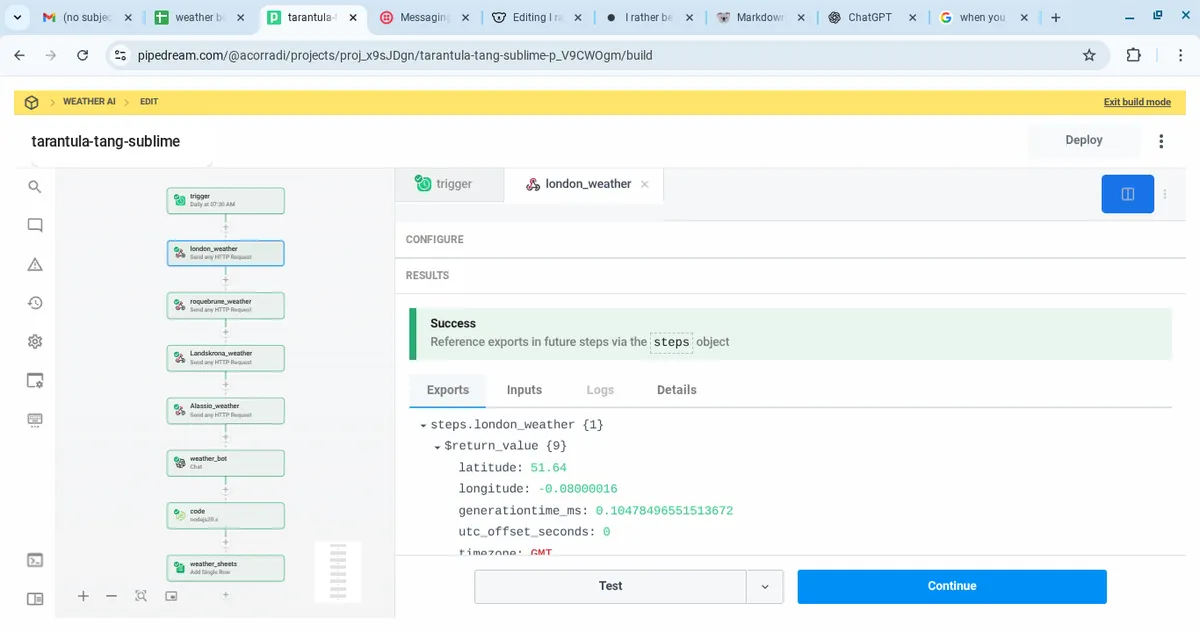
This confirms the step is working.
🌍 Repeat for other cities
Do the same for the other three locations:
Roquebrune‑Cap‑Martin (France)
- Step name:
roquebrune_weather - Coordinates: 43.7745, 7.4903
- Step name:
Landskrona (Sweden)
- Step name:
Landskrona_weather - Coordinates: 55.8713, 12.8282
- Step name:
Alassio (Italy)
- Step name:
Alassio_weather - Coordinates: 44.0031, 8.1816
- Step name:
⚠️ Important: The step names must match exactly — the custom GPT prompt uses these names to pull the data later.
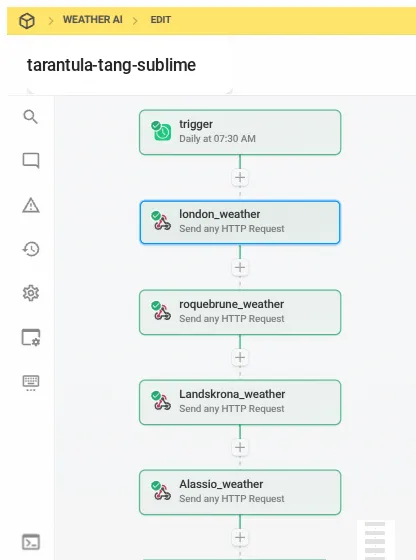
✅ Quick checklist before moving on:
- A Scheduler trigger is set to your chosen time.
- 4 HTTP Request steps exist, one per city.
- Each step is tested and returning data.
- Step names are exactly:
london_weatherroquebrune_weatherLandskrona_weatherAlassio_weather
Once these are in place, you’ve built the foundation for the entire bot.
Step 3 – Connecting the Data to the Brain
With live weather data coming into Pipedream, the next step is to pass that data into our Custom GPT and let it generate the daily message. This is where the “brain” of the bot comes to life.
🔗 How Pipedream sends variables to ChatGPT
Every HTTP Request step you created in Step 2 returns a JSON object. Pipedream makes each value available as a variable that can be inserted into the ChatGPT action.
For example, London’s temperature is available as:
{{steps.london_weather.$return_value.current.temperature_2m}}
The format is always:
{{steps.[STEP_NAME].$return_value.[DATA_PATH]}}
Where:
[STEP_NAME]= the name you gave the HTTP Request step (e.g.london_weather)[DATA_PATH]= the path inside the JSON (e.g.current.temperature_2m)
⚠️ This is why naming your steps exactly is so important. If the names don’t match, the GPT won’t see the data.
🎯 How the GPT decides the “best” weather
We use a simple point system to rank each location:
temperature_2m: 18–27 °C scores highest; subtract points if <10 °C or >32 °Cprecipitation: 0 mm is ideal; light drizzle scores higher than heavy rainwindspeed_10m: 5–15 km/h is best; penalise >25 km/h or <2 km/hweathercode: rank clear > partly cloudy > overcast > rain > snow > fog
The GPT adds up these scores and declares the “winning” location at the top of the message.
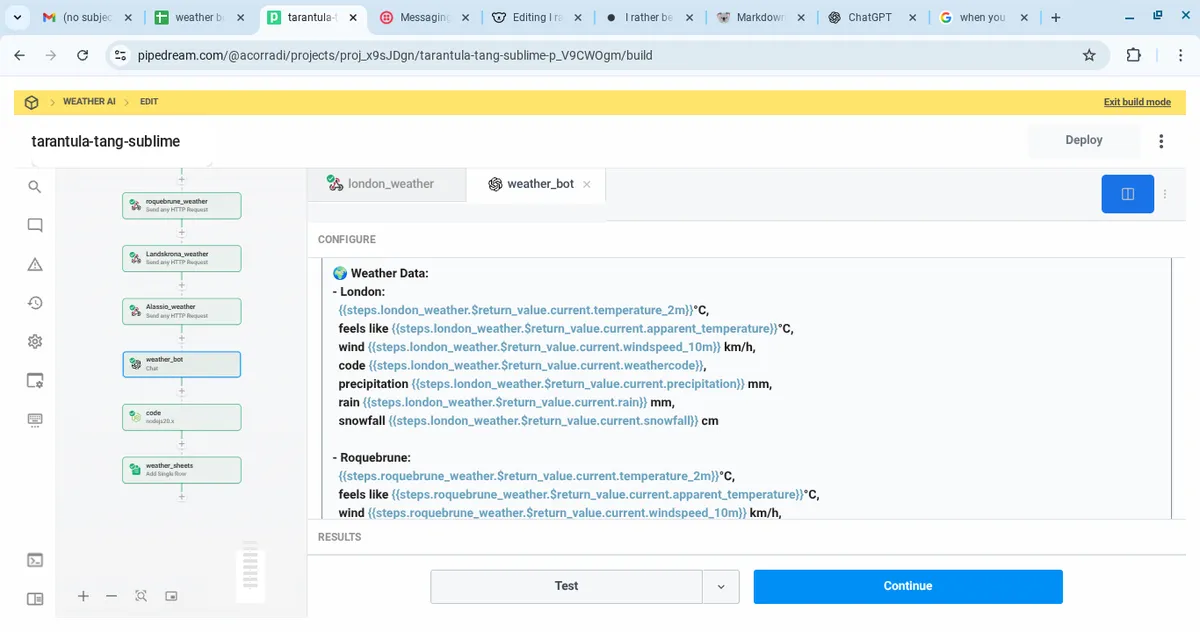
🧩 Mapping the variables into the prompt
We pass all four cities’ data into the GPT using the variables from Pipedream. Here’s an example for London:
- London 🇬🇧:
  {{steps.london_weather.$return_value.current.temperature_2m}}°C,
  feels like {{steps.london_weather.$return_value.current.apparent_temperature}}°C,
  wind {{steps.london_weather.$return_value.current.windspeed_10m}} km/h,
  precipitation {{steps.london_weather.$return_value.current.precipitation}} mm
Each of the other cities uses the same pattern with their respective step names.
📝 The final prompt
This is the exact prompt pasted into the Instructions field of the Custom GPT. It includes all four locations with variables from Pipedream.
You are my Family Weather AI assistant. Each morning, you receive current weather data for four locations:
London (UK), Roquebrune‑Cap‑Martin (France), Landskrona (Sweden), and Alassio (Italy).

🎯 Your tasks:
1. Compare the locations using this scoring system to pick the "winning" location with the best weather:
   - Temperature: 18–27 °C scores highest; subtract points if <10 °C or >32 °C.
   - Precipitation: 0 mm = best; light drizzle scores higher than heavy rain.
   - Wind: 5–15 km/h scores highest; deduct points for >25 km/h or completely calm (<2 km/h).
   - Weather codes: Rank them: ☀️ Clear > 🌤️ Partly Cloudy > 🌥️ Overcast > 🌧️ Rain > ❄️ Snow > 🌫️ Fog.
2. Start the message with: “I’d rather be in [Winning Location]! [Weather Emoji] 🎉🌤️🏖️”
3. Add a visual separator (e.g. “— — —”) before listing locations.
4. Prefix each location with the correct country flag emoji and put the weather emoji immediately after the location name.
5. Only include 🌧️ if precipitation > 0 and ❄️ if snowfall > 0 for that location.
6. Include a random 💡 Fun fact of the day: about one of the four locations (≤200 characters).
7. Write a 100–200 character summary describing the vibe across all four.
8. Always end: “Have a lovely day, Alex”

🌍 Weather Data:
- London 🇬🇧:
  {{steps.london_weather.$return_value.current.temperature_2m}}°C,
  feels like {{steps.london_weather.$return_value.current.apparent_temperature}}°C,
  wind {{steps.london_weather.$return_value.current.windspeed_10m}} km/h,
  code {{steps.london_weather.$return_value.current.weathercode}},
  precipitation {{steps.london_weather.$return_value.current.precipitation}} mm,
  rain {{steps.london_weather.$return_value.current.rain}} mm,
  snowfall {{steps.london_weather.$return_value.current.snowfall}} cm

- Roquebrune‑Cap‑Martin 🇫🇷:
  {{steps.roquebrune_weather.$return_value.current.temperature_2m}}°C,
  feels like {{steps.roquebrune_weather.$return_value.current.apparent_temperature}}°C,
  wind {{steps.roquebrune_weather.$return_value.current.windspeed_10m}} km/h,
  code {{steps.roquebrune_weather.$return_value.current.weathercode}},
  precipitation {{steps.roquebrune_weather.$return_value.current.precipitation}} mm,
  rain {{steps.roquebrune_weather.$return_value.current.rain}} mm,
  snowfall {{steps.roquebrune_weather.$return_value.current.snowfall}} cm

- Landskrona 🇸🇪:
  {{steps.Landskrona_weather.$return_value.current.temperature_2m}}°C,
  feels like {{steps.Landskrona_weather.$return_value.current.apparent_temperature}}°C,
  wind {{steps.Landskrona_weather.$return_value.current.windspeed_10m}} km/h,
  code {{steps.Landskrona_weather.$return_value.current.weathercode}},
  precipitation {{steps.Landskrona_weather.$return_value.current.precipitation}} mm,
  rain {{steps.Landskrona_weather.$return_value.current.rain}} mm,
  snowfall {{steps.Landskrona_weather.$return_value.current.snowfall}} cm

- Alassio 🇮🇹:
  {{steps.Alassio_weather.$return_value.current.temperature_2m}}°C,
  feels like {{steps.Alassio_weather.$return_value.current.apparent_temperature}}°C,
  wind {{steps.Alassio_weather.$return_value.current.windspeed_10m}} km/h,
  code {{steps.Alassio_weather.$return_value.current.weathercode}},
  precipitation {{steps.Alassio_weather.$return_value.current.precipitation}} mm,
  rain {{steps.Alassio_weather.$return_value.current.rain}} mm,
  snowfall {{steps.Alassio_weather.$return_value.current.snowfall}} cm
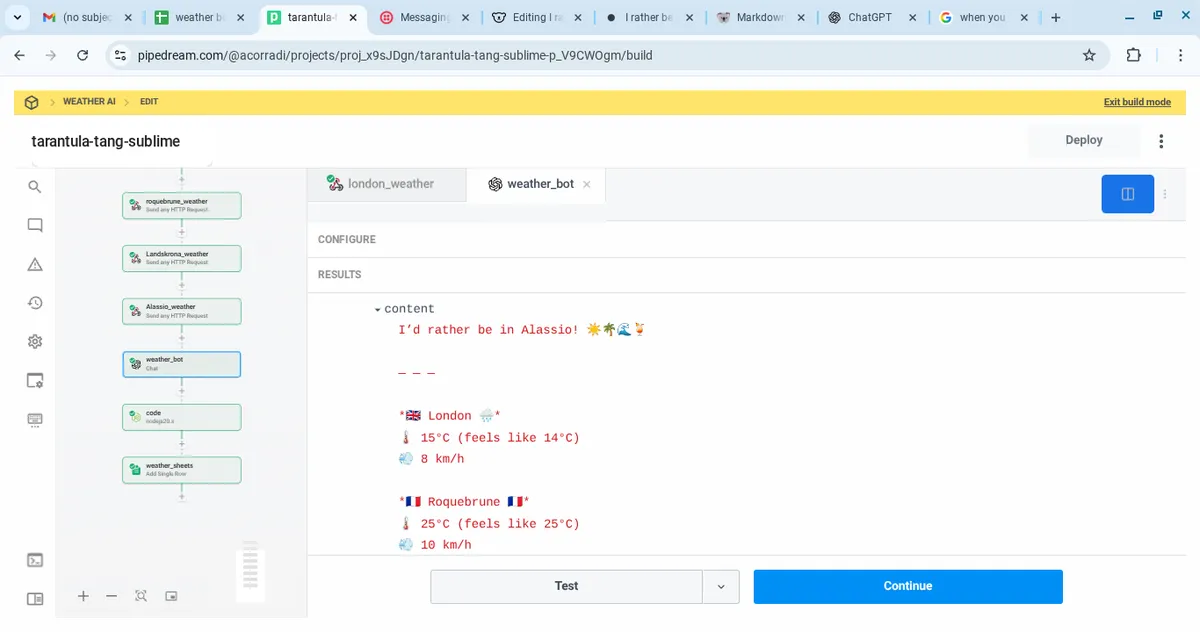
✅ Testing the GPT output
- Deploy and run your Pipedream workflow.
- Check the ChatGPT step output.
- You should see:
- A winning location with emoji on the first line.
- Four cities listed with flags and weather.
- A short summary.
- A 💡 fun fact.
- The closing “Have a lovely day, Alex”.
🌟 Why keep the logic in GPT?
- The entire “decision engine” lives in one place — easy to update without touching automation.
- Pipedream just passes raw data; GPT does all the formatting and scoring.
- You can tweak the scoring system later by editing the prompt without breaking the workflow.
Step 4 – Storing the Weather Data in Google Sheets
Even though the bot sends a WhatsApp message every morning (see step 5), saving the output to a Google Sheet gives you a history of the weather and makes debugging easier. It’s also great if you ever want to visualise trends or create a “family weather archive”.
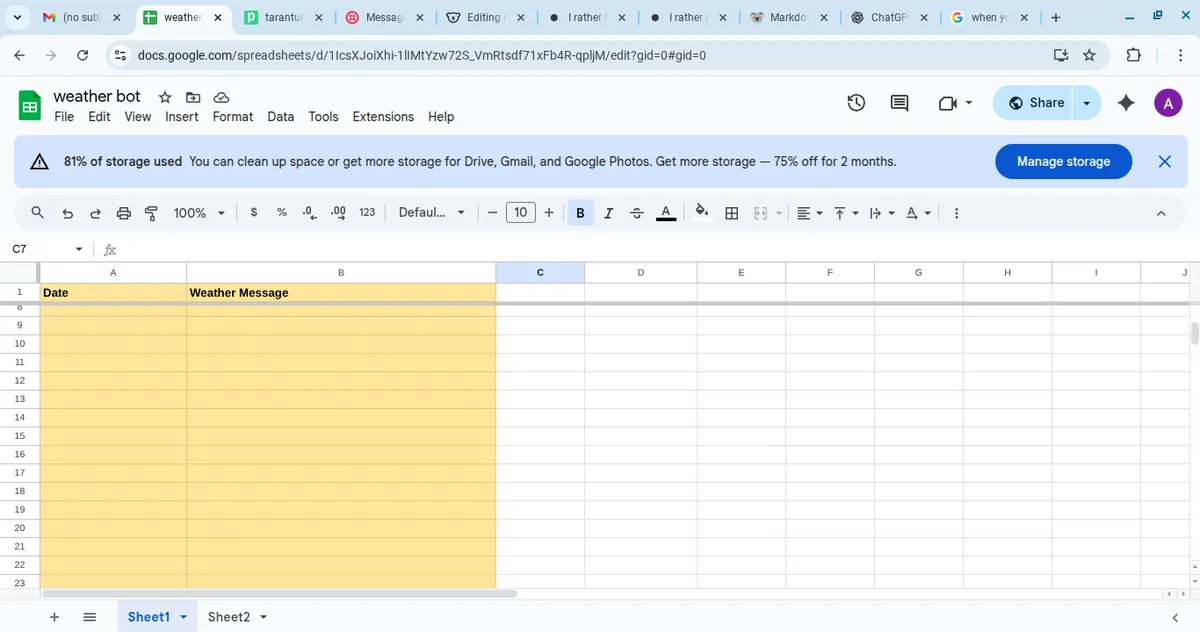
🗒️ Setting up your sheet
Open Google Sheets and create a new spreadsheet.
Name it
Family Weather Log.In the first row, create these headers:
datemessage
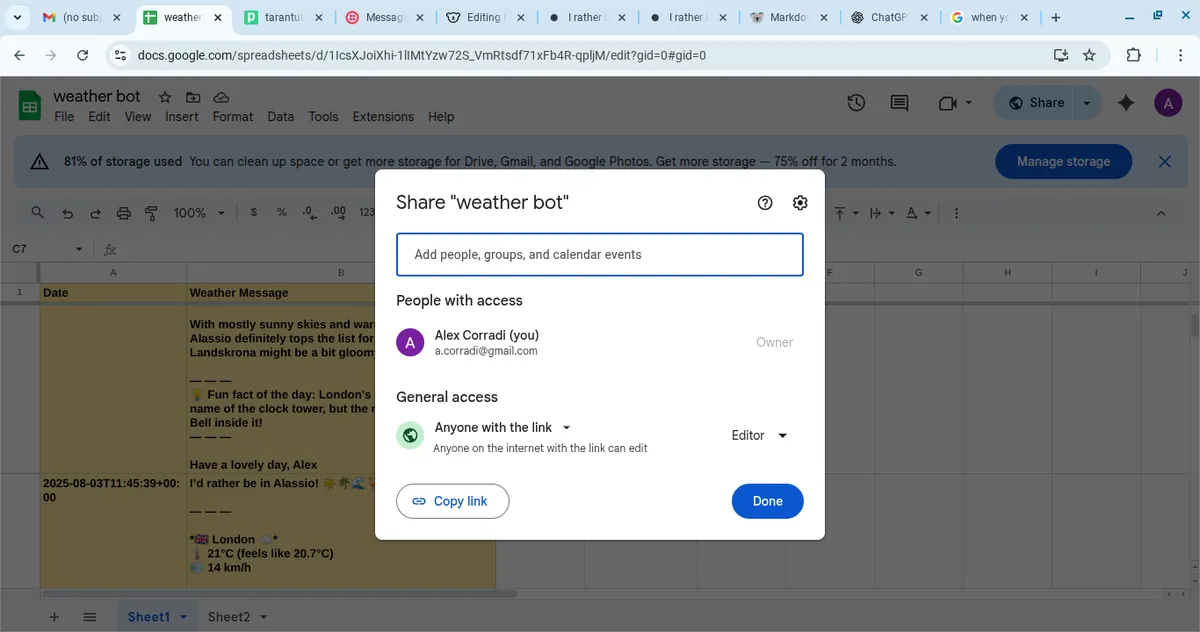
Go to File → Share → Share with others and make sure the Google account you use in Pipedream has access.
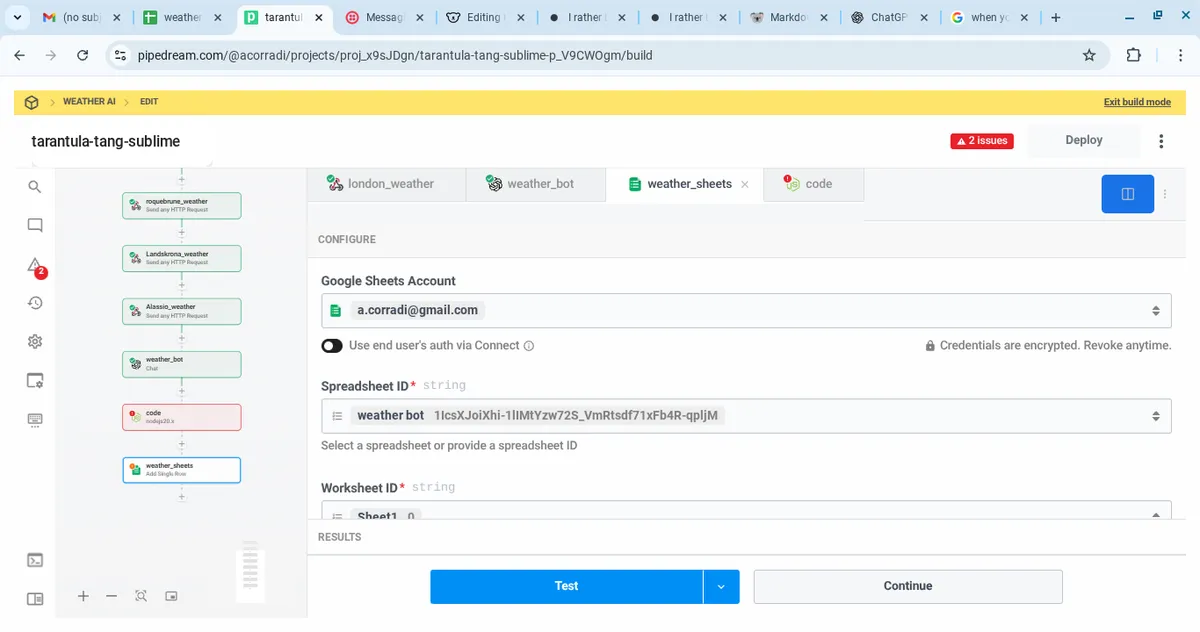
🔗 Connecting Google Sheets to Pipedream
In your Pipedream workflow, click + to add a new step after the ChatGPT step.
Search for Google Sheets → Add a Row.
Click Connect Account and sign in with your Google account.
Choose the spreadsheet you just created and select the correct sheet (e.g.
Sheet1).
🧩 Mapping the fields
You only need two mappings for the MVP:
date → Insert Pipedream’s built‑in date variable:
{{steps.trigger.context.ts}}This inserts the current run timestamp.
message → Insert the GPT output:
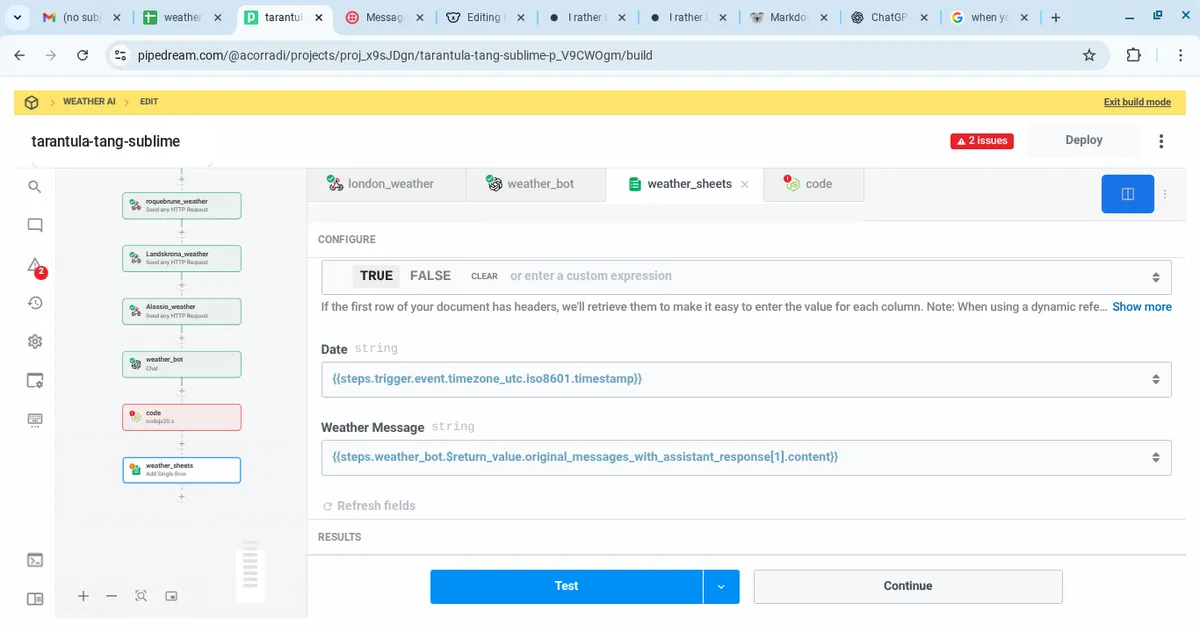
This captures the entire final weather message as a single string.
⚠️ Make sure your ChatGPT step is named weather_bot or adjust the variable path accordingly.
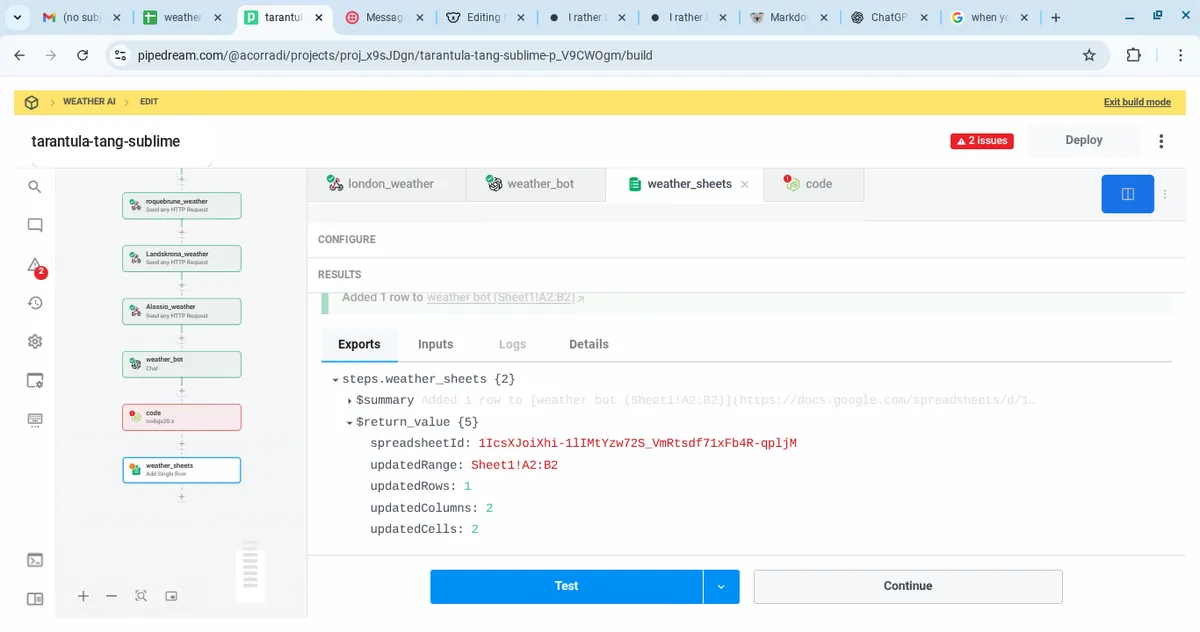
✅ Testing the integration
Click Deploy & Test in Pipedream.
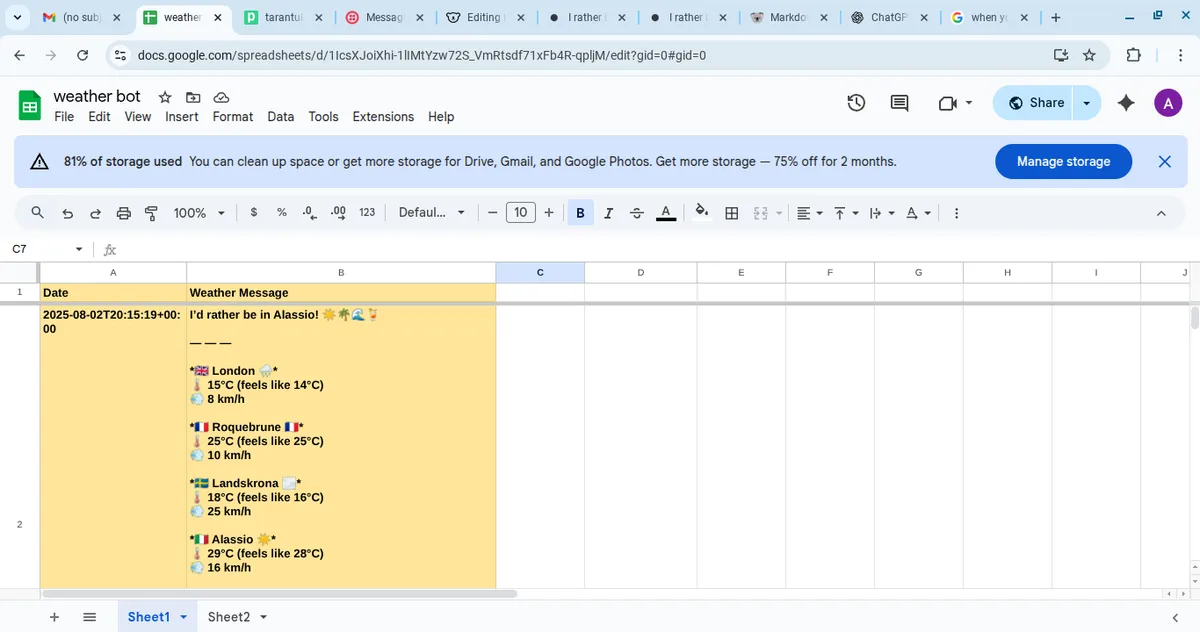
Open your Google Sheet.
You should see a new row added with today’s date and the full weather message.
🌟 Why store the data?
- 📈 Track weather trends over time for each location.
- 🪲 Debug easier if the WhatsApp message ever looks wrong.
- 📜 Build a family “weather diary” you can export later.
- 📊 Use Google Data Studio or Looker to visualise patterns.
✅ At this point, the bot keeps a full historical log automatically.
Step 5 – Sending the Daily Weather via WhatsApp
The last step is to deliver the daily weather message straight to your phone. WhatsApp is perfect because it’s instant and works for the whole family.
💬 Why we use Twilio
Twilio’s WhatsApp Sandbox lets you send automated WhatsApp messages without building a custom app. You can start free and later upgrade to the full WhatsApp Business API if you want to message more people.
🛠️ Set up Twilio and the WhatsApp Sandbox
Go to Twilio and create a free account.
In the Twilio Console, navigate to Messaging → Try it out → Send a WhatsApp message.
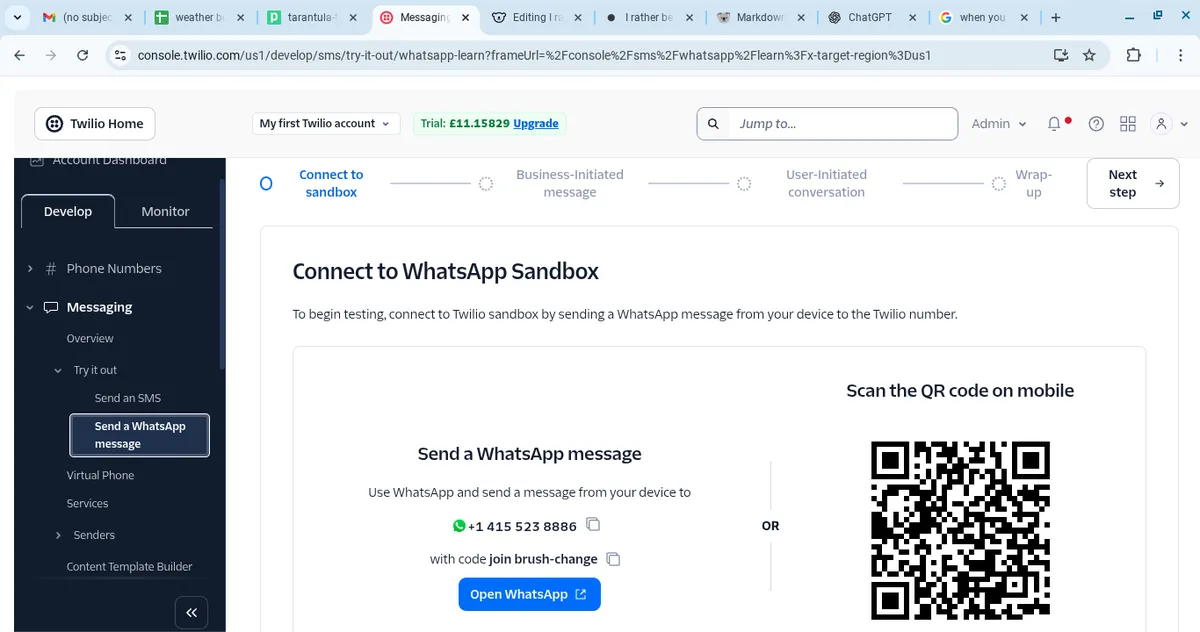
Activate the WhatsApp Sandbox. Twilio will show you a special phone number like:
+14155238886
And a join code like:
join lovely-river
On your own WhatsApp, send the join code to the Twilio number to link your account. You should receive a confirmation message from Twilio.

🔗 Connect Twilio to Pipedream
In your Pipedream workflow, click + to add a new step after the ChatGPT step.
Search for Node.js (Custom Code).
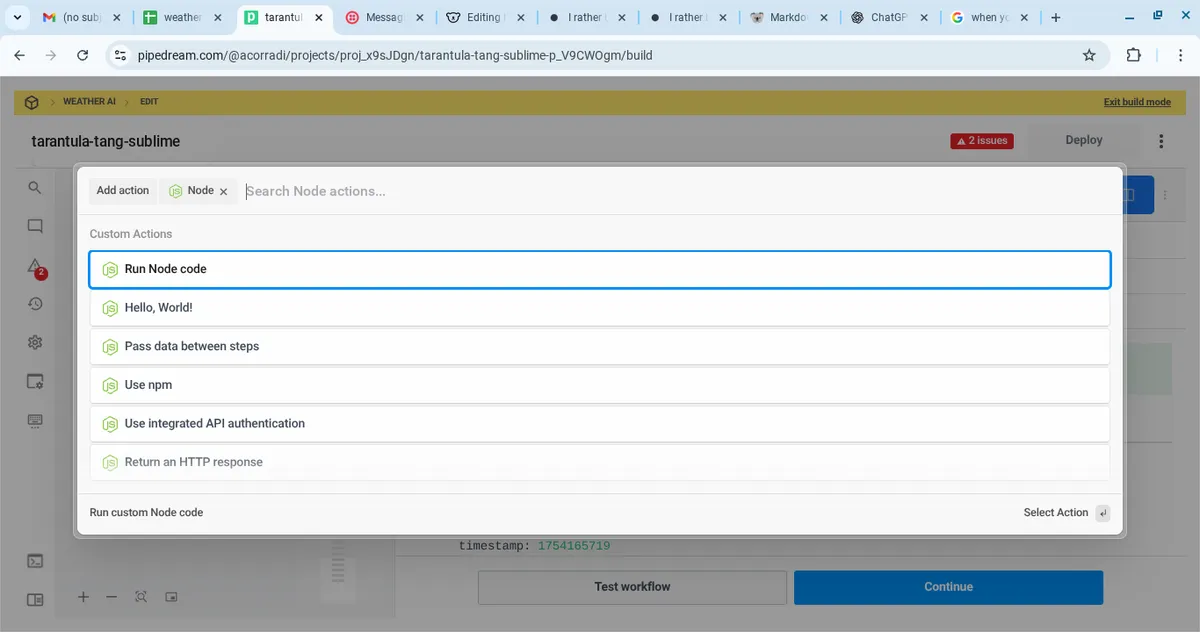
In the code editor, paste this:
 import twilio from "twilio";

 // 🔑 Replace these with your Twilio credentials
 const accountSid = "ACXXXXXXXXXXXXXXXXXXXXXXXXXXXXXXX"; // Your Twilio Account SID
 const authToken = "XXXXXXXXXXXXXXXXXXXXXXXXXXXX";        // Your Twilio Auth Token

 // ✅ Twilio Sandbox number for WhatsApp
 const from = "whatsapp:+14155238886";

 // ✅ Your WhatsApp number (E.164 format)
 const to = "whatsapp:+447XXXXXXXXX"; // Replace with your own number

 export default defineComponent({
   async run({ steps }) {
     const client = twilio(accountSid, authToken);

     // ✅ Use the GPT output or fallback if blank
     const messageBody = steps.weather_bot?.$return_value || "✅ Weather bot test message (fallback).";

     console.log("Weather Bot Output:", steps.weather_bot?.$return_value);

     const response = await client.messages.create({
       from,
       to,
       body: messageBody,
     });

     console.log("Message SID:", response.sid);
     return response;
   },
 });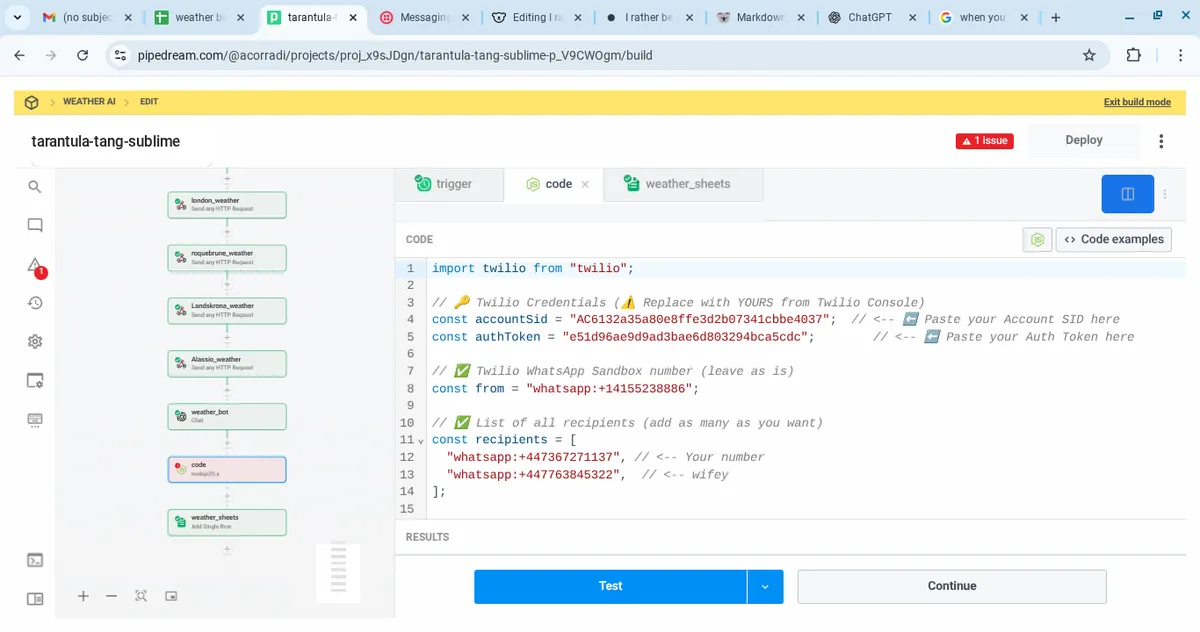
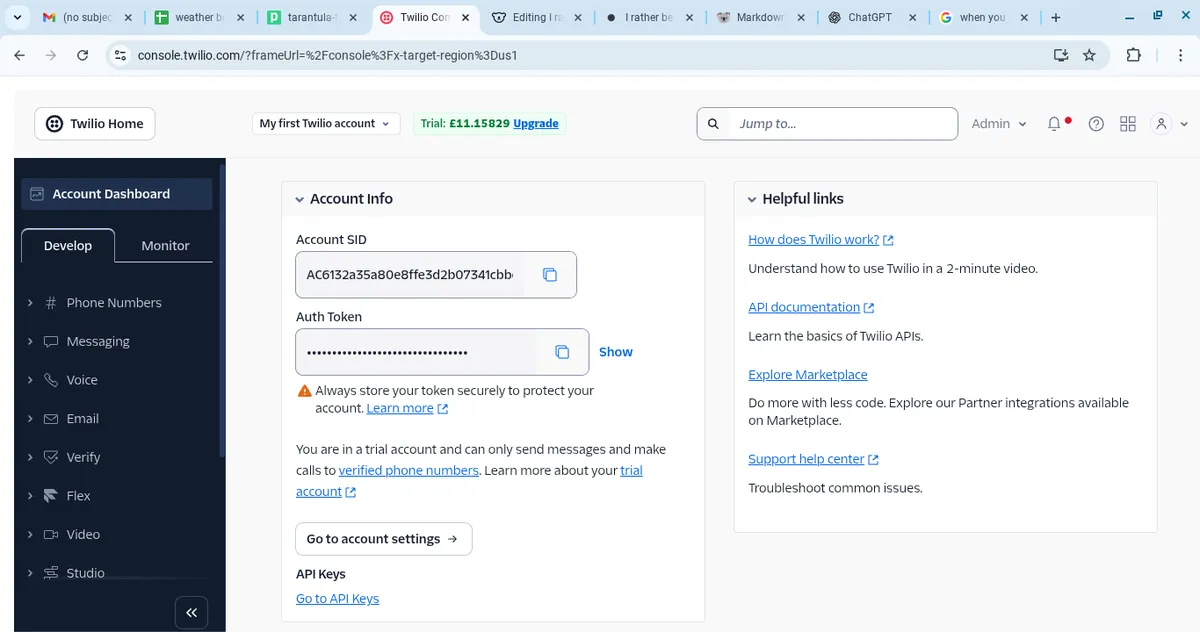
Where to find your Twilio credentials:
- In the Twilio Console, click your account name (top right) → Account Settings.
- Copy the Account SID and Auth Token into the code above.
Replace the
tonumber with your own WhatsApp number in full international format (e.g.+447123456789).
🧩 Mapping the GPT output
The code above automatically pulls the entire GPT output from:
{{steps.weather_bot.$return_value}}
⚠️ Make sure your ChatGPT step is named weather_bot or adjust this line accordingly.
✅ Test the WhatsApp message
Click Deploy & Test in Pipedream.
You should receive a WhatsApp message from the Twilio Sandbox number with the full weather report.
If you see the fallback message instead, double‑check:
- The ChatGPT step name matches
steps.weather_bot. - The GPT output isn’t blank in the Pipedream test results.
📈 Moving beyond the sandbox
The sandbox is limited to your own number and anyone who joins manually. To send to multiple family members automatically:
- Upgrade to Twilio’s WhatsApp Business API.
- Register a dedicated phone number.
- Add each family member’s number as a
torecipient in the code or via a list.
✅ At this point, your bot fetches live weather, generates a playful daily message, logs it in Google Sheets, and delivers it to WhatsApp every morning. Job done!🚀
Reflections ( ˘_˘ )
This project came together in 48 hours of focused work. The goal was simple: build a weather bot that collects live data for London, Roquebrune‑Cap‑Martin, Landskrona and Alassio, generates a daily summary, and sends it to WhatsApp.
The process involved testing several automation tools. Zapier was the first choice but ran into issues with variable mapping and inconsistent data handling. Gumloop was too limited on the free tier, and Make.com added unnecessary complexity. Pipedream proved to be the most flexible and reliable option for connecting APIs and handling the workflow.
Key challenges included managing blank variables, working with JSON paths, and configuring Twilio’s WhatsApp sandbox for message delivery. The first successful test confirmed the workflow: pull data via Open‑Meteo, generate the message in a Custom GPT, log it in Google Sheets, and send it through WhatsApp.
ChatGPT’s role was primarily technical support: generating the Node.js code for Twilio, creating the weather scoring logic, debugging variable mapping, and refining the custom prompt. The result is a fully automated daily weather agent built without writing a traditional backend or front‑end system.
I’ll park this for now, but in time I may come back and enhance it. This mini‑project has also given me a solid foundation heading into my main Agentic project, the AI Literary Cartographer.
---END---